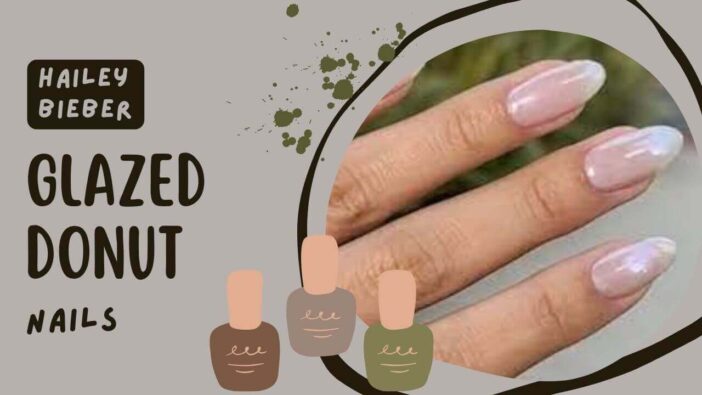
Healthbeautyidea.com | Hailey Bieber Glazed Donut Nails – When it comes to setting trends in the world of fashion and beauty, Hailey Bieber is a name that can’t be overlooked. Her latest style statement – the mesmerizing glazed donut nails – has taken the fashion world by storm.
These nails, characterized by their glossy finish and delectable pastel hues, have become the go-to choice for fashionistas looking to make a bold statement. In this comprehensive guide, we’ll walk you through the steps to achieve this iconic nail look, ensuring your hands stand out in any crowd.
The Art of Hailey Bieber Glazed Donut Nails
Achieving Hailey Bieber glazed donut nails requires a combination of precision, creativity, and the right tools. The glossy finish mimics the mouthwatering look of a freshly glazed donut, making it a striking accessory for any outfit. With a range of pastel colors to choose from, you can customize this look to suit your personal style.
To start, gather the essentials: a set of high-quality nail polishes in your chosen shades, a clear top coat for that irresistible shine, a nail file, and a steady hand. Once you have your supplies in order, it’s time to dive into the process.
Step-by-Step Guide: Achieving Glazed Donut Nails
Step 1: Prepping Your Canvas
Before you start painting, it’s crucial to prepare your nails. Begin by shaping them to your desired length and style. Use a gentle buffer to smooth out any ridges or imperfections. This ensures a clean canvas for the polish to adhere to, resulting in a flawless finish.
Next, apply a base coat to protect your natural nails and enhance the longevity of your glazed donut manicure. Allow it to dry completely before moving on to the next step.
Step 2: Choosing Your Color Palette
Hailey Bieber’s glazed donut nails often feature soft, pastel shades that exude elegance and charm. From baby blues to cotton candy pinks, the options are endless. Select two or three complementary colors that resonate with your personal style and outfit choices.
Step 3: Creating the Glazed Effect
Now comes the fun part – creating that delectable glazed look. Apply the first chosen color evenly across each nail, ensuring full coverage. Allow it to dry completely before moving on to the next color. Repeat this process with your chosen shades, alternating them for a dynamic and eye-catching effect.
Step 4: Sealing the Deal
Once your chosen colors have dried to perfection, it’s time to seal the look with a clear, high-gloss top coat. This not only adds an extra layer of shine but also protects your masterpiece from chipping and fading.
Step 5: Final Touches
After allowing the top coat to dry, marvel at your stunning glazed donut nails. If desired, add a touch of nail art or embellishments for a personalized twist. With these nails, you’re ready to conquer the world with confidence and style.
Frequently Asked Questions About Hailey Bieber Glazed Donut Nails
How long does it take to achieve glazed donut nails?
Achieving the perfect glazed donut nails typically takes around 30-45 minutes, including drying time between coats. With practice, you’ll be able to refine the process and achieve salon-worthy results in no time.
Can I use different color combinations for glazed donut nails?
Absolutely! The beauty of glazed donut nails lies in their versatility. Experiment with different color combinations to suit your mood, outfit, or occasion.
Bottom Line: Embrace Your Inner Trendsetter with Glazed Donut Nails
Hailey Bieber glazed donut nails have revolutionized nail art, offering a unique and delectable twist to manicures. With the right technique and a touch of creativity, you can achieve this iconic look and make a statement wherever you go. Whether you opt for soft pastels or vibrant hues, let your nails be a canvas for self-expression and individuality.


 3")

 Skincare Solutions & Skin Health
 Mental Health, Stress & Emotional Wellbeing
 Sleep, Energy & Daily Performance